Creating PDF Files
Most modern software have a built in way to create PDF files. Before going any further in this guide, look for in your “Save As”, “Export” or “Publish” options to see if your software has a built in PDF creator. If you are having trouble finding a way to export or save to a PDF look under our Application Specific section.
If your software does not natively support creating PDF files or you are not getting the results you want continue on to Creating PDF files with CutePDF Writer.
Creating PDFs from MS Office 2000 & 2003
Unfortunately version of Microsoft Office before 2007 did not support “Saving As” a pdf file, so you will have to use the above generic instruction so of “Printing to a PDF“
Creating PDFs from MS Office 2007
Microsoft Office 2007 does not natively support saving to a PDF file, but Microsoft does offer a free download to add that feature. Once you download & install the Microsoft Save as PDF or XPS Add-In, you should be able to use the “Save As” option in the File menu to save your document as a PDF file. Open your document, go to File > Save As, then in then under File Type select “PDF”.
Creating PDFs from MS Office 2010, 2013, 2016 & Office 365
In the newest versions of Microsoft Office (2010, 2013, 2016 & Office 365) it natively supports saving to PDF files. You should be able to go to File > Save As, then under File Type select “PDF”. If you need additional help Microsoft was nice enough to post a very comprehensive guide.
Autocad DWG
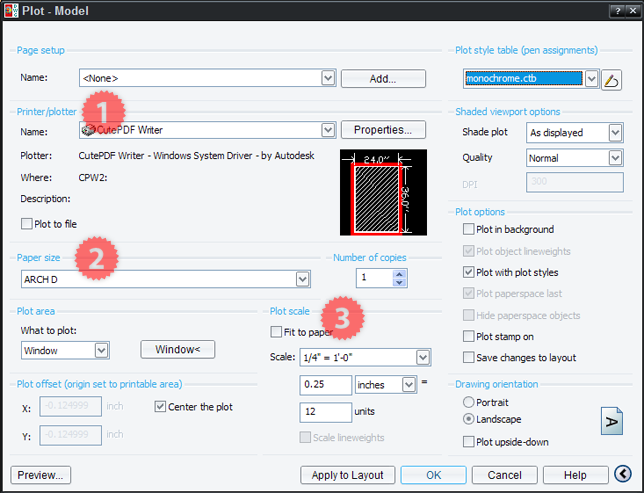
Creating PDF files using CutePDF is as simple as printing a normal file to your plotter. Scale is often a problem when draftsmen/architects/engineers get their files printed. Creating PDFs will help eliminate this issue by putting the control over the scale and page size in your hands.

Your Autocad Print Dialog may differ from this image but key elements should still be present.
- Choose CutePDF Writer from the Plotter Name Field
- Choose the appropriate paper size (in this case Architectural D)
- Select the proper scale for your document.
If you are not using layouts you may also have to choose your plot area specifically by choosing Window from What to plot.
The exact process will very depending on which CAD software you are using. If you are looking for a software to view DWG and other CAD files we recommend AutoDesk’s DWG TrueView free CAD viewer. This software and the above method is what we use to convert DWG files to PDF for printing.
Adobe InDesign
While we have no problems using Adobe InDesign files, we will often run into issues with missing links and fonts. To avoid these problems it is best to export InDesign documents to PDF files before sending to us for printing.
PDF creating options are found under File > Export. For more information Adobe has a comprehensive help article on the topic.
If a document must be sent as an InDesign file, please Package (File>Package) the InDesign file first so all Links and Fonts will be included. For more information on Packaging InDesign files visit Adobe’s help files.
Any raster are elements should be a minimum resolution of 300dpi for best results. For more information visit our Artwork & File Guidelines.
Adobe Illustrator
While we have no problems using Adobe Illustrator files, we will often run into issues with missing links and fonts. To avoid these problems it is best to save Illustrator documents to PDF files before sending to us for printing.
Illustrator natively supports saving to PDF files. Chose File > Save As, then select PDF as your file type. Click Save. A second window will pop-up giving you additional options for your PDF file.
If your document must be sent as an Illustrator file please outline or expand all text and include any linked files.
Any raster are elements should be minimum resolution of 300dpi for best results. If possible build your document at the final size it will be printed at. For more information visit our Artwork & File Guidelines.
Adobe Photoshop
While we have no problems using Adobe Photoshop files, we will often run into issues with missing fonts or effects not rendering correctly from one version to another. To avoid these problems it is best to save Photoshop documents to PDF files before sending to us for printing.
Photoshop natively supports saving to PDF files. Chose File > Save As, then select PDF as your file type. Click Save. A second window will pop-up giving you additional options for your PDF file.
If you have a large format (Poster, Banner, Signs) project it may be better to save your document as a TIFF file. Chose File > Save As, then select TIFF as your file type, and un-check Layers. A second window will pop-up giving you additional options for your TIFF file. Make sure Layers is set to None. This will give a much smaller and easier to handle TIFF file.
If your document must be sent as an Photoshop file please rasterize all font layers or include any specialized fonts you used.
Please build any Photoshop files at a minimum resolution of 300dpi for best results, and if possible at the finished size they should be printed. For more information visit our Artwork & File Guidelines.
Creating PDF files with CutePDF Writer
To create PDF files from your Windows PC, you will first need an extra piece of software. (please skip this step if you already have a PDF creator such as Adobe Acrobat or PDFCreator) Kalispell Copy Center recommends the free CutePDF Writer. CutePDF Writer comes in two files which must be downloaded and installed: Download 1, Download 2. Once you have downloaded and installed both these files, continue to Step 2.
Mac OS X and Linux users already have PDF creation built into the operating system. For users of these systems, simply print to your PDF Printer, or variants thereof.
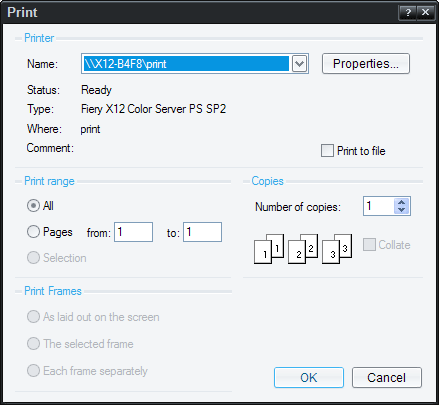
Now that we have CutePDF installed, creating PDF files is as easy as printing to a printer. This is often referred to as “Printing to a PDF”. If you don’t see your application listed under the Application specific section, this is the method you want to use. In your application, choose the print command and you will be presented with a window similar to this one:

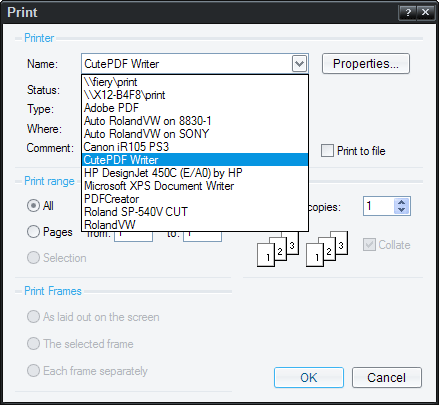
Choose CutePDF Writer from the drop-down menu:

Click OK or Print to confirm the Print Dialog:
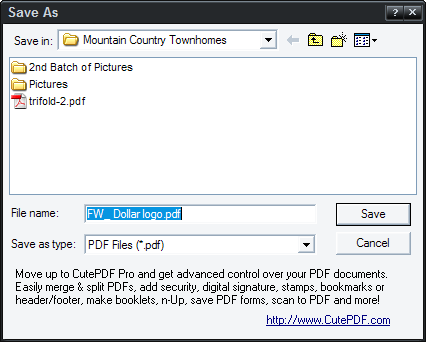
You will be presented with a Save As dialog by CutePDF. Choose the location for your PDF and click OK. A file will be created in the location chosen.

You’re Done!

GENERAL INFO
info@kalcopy.com
ON FOOT
Kalispell Copy Center
2303 US Highway 2 E.
Kalispell, MT 59901
OFFICE
Monday – Friday
8am – 6pm
Phone: (406) 755-5888
Fax: (406) 755-5896
Proud Member Of:
Proud Member Of:

